Intel Developer Cloud Quick Start Guide
On this Page
Intel Developer Cloud Quick Start Guide
This document provides instructions on setting up the Intel® Gaudi® 2 AI accelerator instance on the Intel Developer Cloud and running models from the Intel Gaudi Model References repository and the Hugging Face Optimum for Intel Gaudi library.
Please follow along with the video on our Developer Page to walk through the steps below. To set up a multi-server instance with two or more Gaudi nodes, refer to Setting up a Multi-Server Environment.
Creating an Account and Getting an Instance
Follow the below steps to get access to the Intel Developer Cloud and launch a Gaudi 2 card instance.
Go to https://console.cloud.intel.com and select Getting Started to create an account and get SSH access.
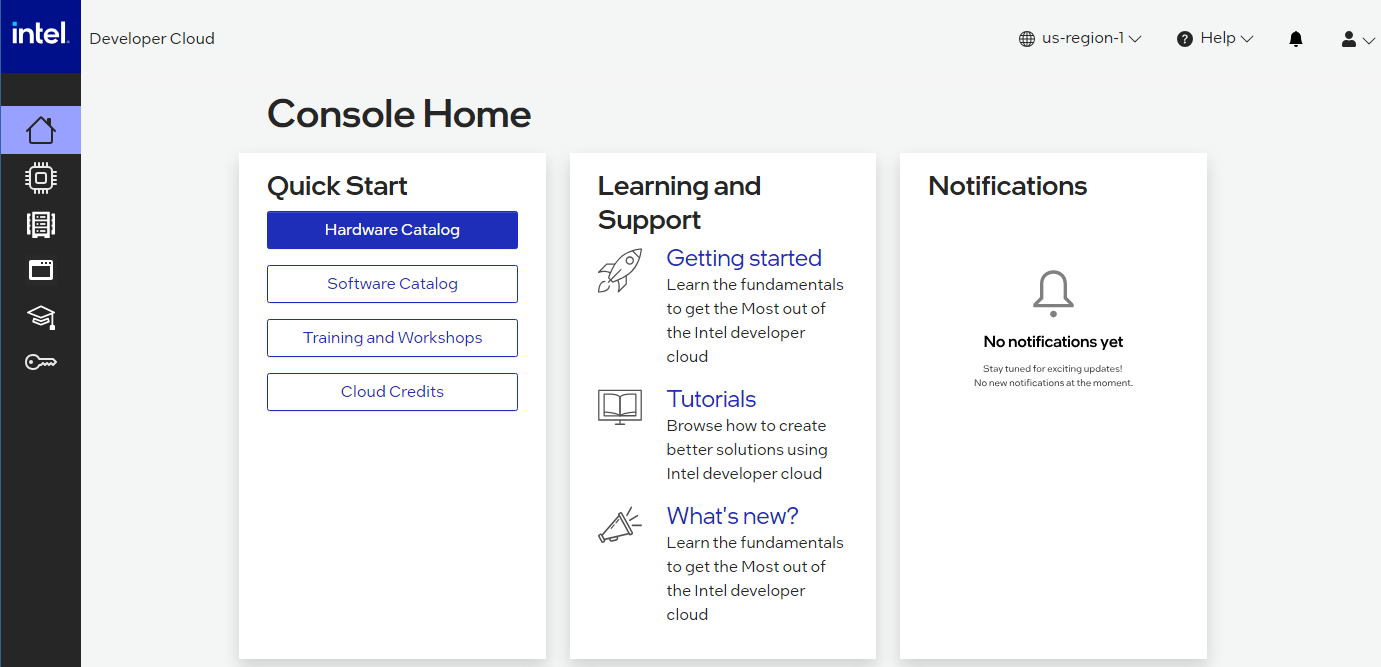
Go to “Console Home” and select “Hardware Catalog”:
Select the “Gaudi 2 Deep Learning Server”:

In the instance Configuration window, enter an instance name and select the SSH key that you created in the Getting Started section. Click “Launch”. You will see that the node is being provisioned:
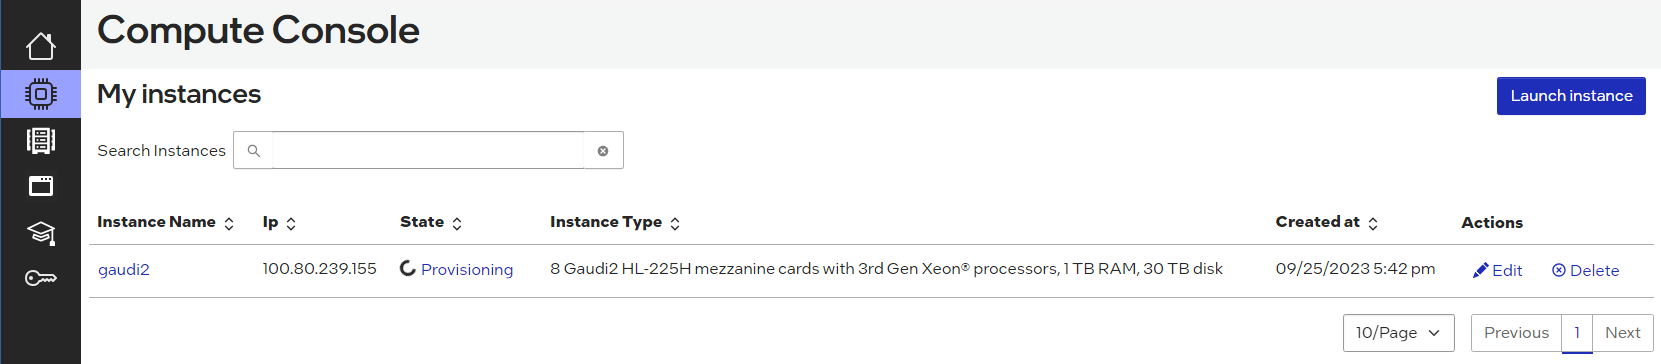
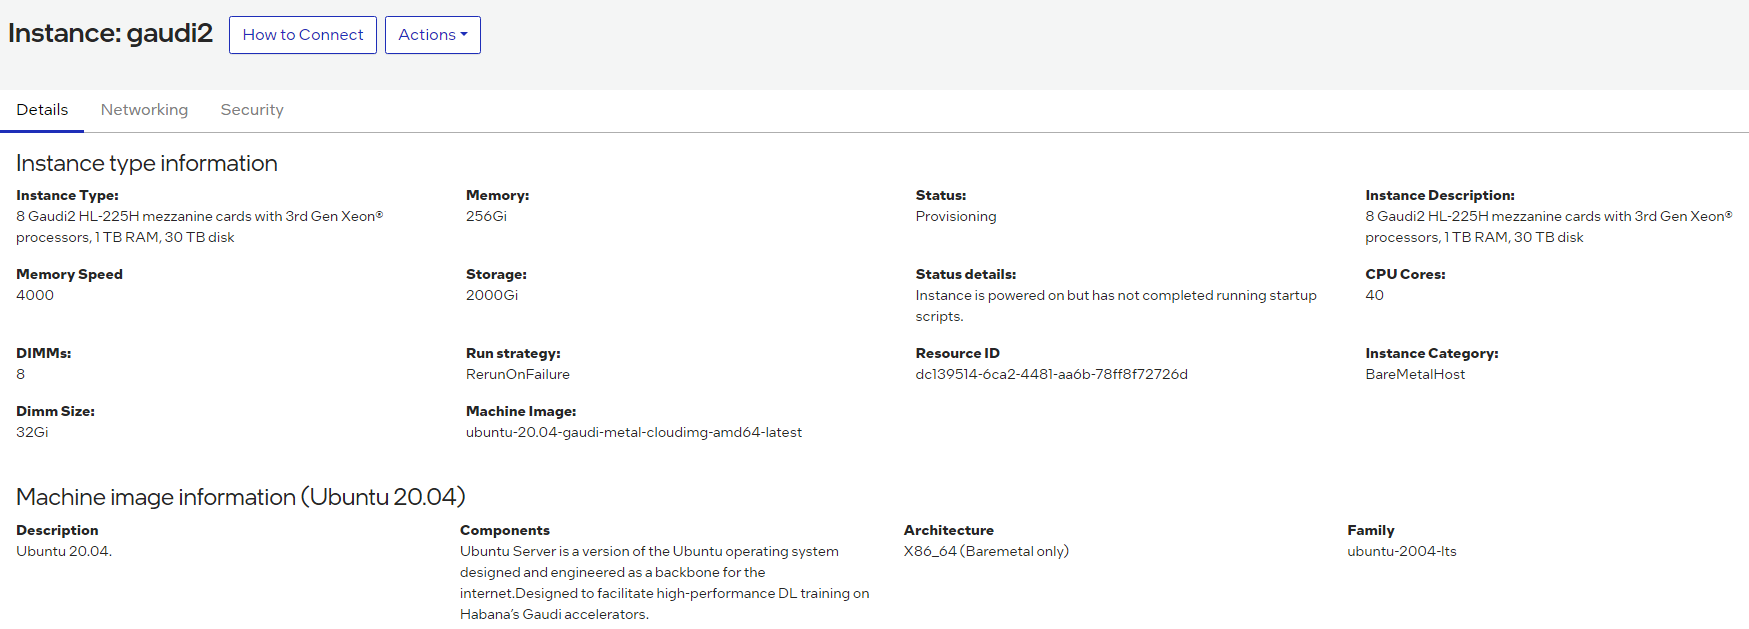
Once the State has changed from “provisioning” to “ready”, click on the instance name. Then select the “How to Connect” box:
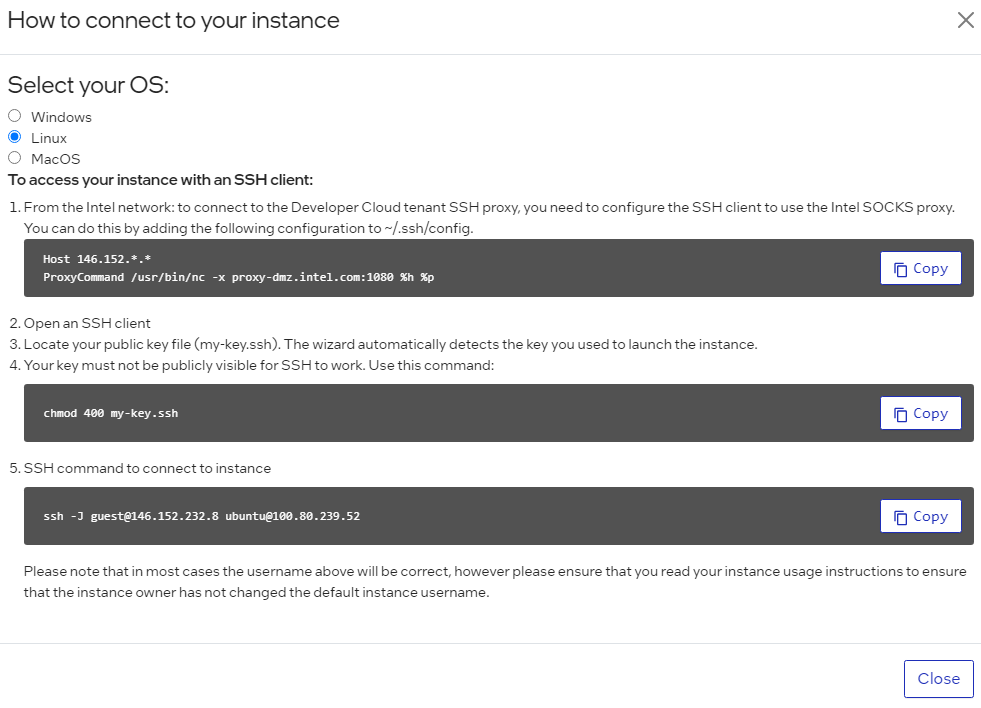
You will then see all the options to SSH into the Developer Cloud instance. Copy the SSH command and paste it into your terminal window:
Note
If you do not have access to the Gaudi 2 instance, you will need to request access to be added to the wait list.
Start Training a PyTorch Model on Gaudi 2
Note
For partners not using the Intel Developer Cloud, follow the instructions starting from this section to run models using Gaudi.
Now that the instance has been created, start with some simple model examples from the Intel Gaudi Model References GitHub repository.
Run the
hl-smitool to confirm the Intel Gaudi software version used on your Developer Cloud instance. You will need to use the correct software version in thedocker runandgit clonecommands. Use the HL-SMI Version at the top. In this case, the version is 1.18.0:HL-SMI Version: hl-1.18.0-XXXXXXX Driver Version: 1.18.0-XXXXXXRun the Intel Gaudi Docker image:
docker run -it --runtime=habana -e HABANA_VISIBLE_DEVICES=all -e OMPI_MCA_btl_vader_single_copy_mechanism=none --cap-add=sys_nice --net=host --ipc=host vault.habana.ai/gaudi-docker/1.18.0/ubuntu22.04/habanalabs/pytorch-installer-2.4.0:latest
Note
You may see this error message after running the above docker command:
docker: permission denied while trying to connect to the Docker daemon socket at unix:///var/run/docker.sock: Head "http://%2Fvar%2Frun%2Fdocker.sock/_ping": dial unix /var/run/docker.sock: connect: permission denied.In such a case, you need to add your user to the docker group with this command:
sudo usermod -a -G docker $USERExit the terminal and re-enter. Your original docker command should work without any issues.
Clone the Model References repository inside the container that you have just started:
   cd ~
   git clone -b 1.18.0 https://github.com/HabanaAI/Model-References.git
Move to the subdirectory containing the hello_world example:
cd Model-References/PyTorch/examples/computer_vision/hello_world/
Update the environment variables to point to where the Model References repository is located and set PYTHON to Python executable:
export PYTHONPATH=$PYTHONPATH:/root/Model-References
export PYTHON=/usr/bin/python3.10
Note
The Python version depends on the operating system. Refer to the Support Matrix for a full list of supported operating systems and Python versions.
Training on a Single Gaudi Card
Run training on a single HPU in BF16 with autocast enabled. This is a simple linear regression model. Copy this run command into your terminal window:
$PYTHON mnist.py --batch-size=64 --epochs=1 --lr=1.0 --gamma=0.7 --hpu --autocast
The following shows the expected output:
============================= HABANA PT BRIDGE CONFIGURATION ===========================
PT_HPU_LAZY_MODE = 1
PT_RECIPE_CACHE_PATH =
PT_CACHE_FOLDER_DELETE = 0
PT_HPU_RECIPE_CACHE_CONFIG =
PT_HPU_MAX_COMPOUND_OP_SIZE = 9223372036854775807
PT_HPU_LAZY_ACC_PAR_MODE = 1
PT_ HPU_ENABLE_REFINE_DYNAMIC_SHAPES = 0
---------------------------: System Configuration :---------------------------
Num CPU Cores : 160
CPU RAM       : 1056446944 KB
------------------------------------------------------------------------------
Train Epoch: 1 [0/60000.0 (0%)] Loss: 2.296875
Train Epoch: 1 [640/60000.0 (1%)]       Loss: 1.546875
***
Train Epoch: 1 [58880/60000.0 (98%)]    Loss: 0.020264
Train Epoch: 1 [59520/60000.0 (99%)]    Loss: 0.001488

Total test set: 10000, number of workers: 1
* Average Acc 98.620 Average loss 0.043
Distributed Training on 8 Gaudis
Run training on the same model using all eight HPUs. Copy this run command into your terminal window:
mpirun -n 8 --bind-to core --map-by slot:PE=6 \
      --rank-by core --report-bindings \
      --allow-run-as-root \
      $PYTHON mnist.py \
      --batch-size=64 --epochs=1 \
      --lr=1.0 --gamma=0.7 \
      --hpu --autocast
The following shows part of the expected output:
| distributed init (rank 0): env://
| distributed init (rank 3): env://
| distributed init (rank 5): env://
| distributed init (rank 6): env://
| distributed init (rank 4): env://
| distributed init (rank 7): env://
| distributed init (rank 1): env://
| distributed init (rank 2): env://
============================= HABANA PT BRIDGE CONFIGURATION ===========================
PT_HPU_LAZY_MODE = 1
PT_RECIPE_CACHE_PATH =
PT_CACHE_FOLDER_DELETE = 0
PT_HPU_RECIPE_CACHE_CONFIG =
PT_HPU_MAX_COMPOUND_OP_SIZE = 9223372036854775807
PT_HPU_LAZY_ACC_PAR_MODE = 1
PT_ HPU_ENABLE_REFINE_DYNAMIC_SHAPES = 0
---------------------------: System Configuration :---------------------------
Num CPU Cores : 160
CPU RAM       : 1056446944 KB
------------------------------------------------------------------------------
Train Epoch: 1 [0/7500.0 (0%)]  Loss: 2.296875
Train Epoch: 1 [640/7500.0 (9%)]        Loss: 1.578125
Train Epoch: 1 [1280/7500.0 (17%)]      Loss: 0.494141
***
Train Epoch: 1 [5760/7500.0 (77%)]      Loss: 0.100098
Train Epoch: 1 [6400/7500.0 (85%)]      Loss: 0.088379
Train Epoch: 1 [7040/7500.0 (94%)]      Loss: 0.067871

Total test set: 10000, number of workers: 8
* Average Acc 97.790 Average loss 0.066
Fine-tuning with Hugging Face Optimum for Intel Gaudi Library
The Optimum for Intel Gaudi library is the interface between the Hugging Face Transformers and Diffusers libraries and the Gaudi 2 card. It provides a set of tools enabling easy model loading, training and inference on single and multi-card settings for different downstream tasks. The following example uses the text-classification task to fine-tune a BERT-Large model with the MRPC (Microsoft Research Paraphrase Corpus) dataset and also run inference.
Follow the below steps to install the stable release from the Optimum for Intel Gaudi examples and library:
Clone the Optimum for Intel Gaudi project to access the examples that are optimized for Gaudi:
cd ~
git clone https://github.com/huggingface/optimum-habana.git
cd optimum-habana
git checkout 1.14.1
Install the Optimum for Intel Gaudi library. This will install the latest stable release:
pip install optimum-habana==1.14.1
In order to use the DeepSpeed library on Gaudi 2, install the Intel Gaudi DeepSpeed fork:
pip install git+https://github.com/HabanaAI/[email protected]
The following example is based on the Optimum for Intel Gaudi Text Classification task example. Change to the text-classification directory and install the additional SW requirements for this specific example:
cd ~
cd optimum-habana/examples/text-classification/
pip install -r requirements.txt
Now your system is ready to execute fine-tuning on a BERT-Large model.
Execute Single-Card Training
In the ~/optimum-habana/examples/text-classification/ folder, copy and paste the following commands to your terminal window
to fine-tune the BERT-Large model on one Gaudi card:
python run_glue.py \
--model_name_or_path bert-large-uncased-whole-word-masking \
--gaudi_config_name Habana/bert-large-uncased-whole-word-masking  \
--task_name mrpc   \
--do_train   \
--do_eval   \
--per_device_train_batch_size 32 \
--learning_rate 3e-5  \
--num_train_epochs 3   \
--max_seq_length 128   \
--output_dir ./output/mrpc/  \
--use_habana  \
--use_lazy_mode   \
--bf16   \
--use_hpu_graphs_for_inference \
--throughput_warmup_steps 3
The results will show both training and evaluation:
 {'train_runtime': 54.8875, 'train_samples_per_second': 266.059, 'train_steps_per_second': 8.342, 'train_loss': 0.3403122169384058, 'epoch': 3.0, 'memory_allocated (GB)': 7.47, 'max_memory_allocated (GB)': 9.97, 'total_memory_available (GB)': 94.61}
 100%|██████████████ 345/345 [00:54<00:00,  6.29it/s]

***** train metrics *****
epoch                       =        3.0
max_memory_allocated (GB)   =       9.97
memory_allocated (GB)       =       7.47
total_memory_available (GB) =      94.61
train_loss                  =     0.3403
train_runtime               = 0:00:54.88
train_samples               =       3668
train_samples_per_second    =    266.059
train_steps_per_second      =      8.342

 ***** eval metrics *****
epoch                       =        3.0
eval_accuracy               =     0.8775
eval_combined_score         =     0.8959
eval_f1                     =     0.9144
eval_loss                   =     0.4336
eval_runtime                = 0:00:01.73
eval_samples                =        408
eval_samples_per_second     =    234.571
eval_steps_per_second       =     29.321
max_memory_allocated (GB)   =       9.97
memory_allocated (GB)       =       7.47
total_memory_available (GB) =      94.61
Execute Multi-Card Training
In this example, you will be doing the same fine-tuning task on eight Gaudi 2 cards. Copy and paste the following into the terminal window:
python ../gaudi_spawn.py  --world_size 8 --use_mpi run_glue.py  \
--model_name_or_path bert-large-uncased-whole-word-masking  \
--gaudi_config_name Habana/bert-large-uncased-whole-word-masking  \
--task_name mrpc  \
--do_train  \
--do_eval  \
--per_device_train_batch_size 32  \
--per_device_eval_batch_size 8  \
--learning_rate 3e-5  \
--num_train_epochs 3   \
--max_seq_length 128  \
--output_dir /tmp/mrpc_output/  \
--use_habana   \
--use_lazy_mode   \
--bf16    \
--use_hpu_graphs_for_inference  \
--throughput_warmup_steps 3
You will see the training samples per second results are significantly faster when using all eight Gaudi 2 cards:
{'train_runtime': 41.8426, 'train_samples_per_second': 1663.393, 'train_steps_per_second': 6.825, 'train_loss': 0.5247347513834636, 'epoch': 3.0, 'memory_allocated (GB)': 8.6, 'max_memory_allocated (GB)': 34.84, 'total_memory_available (GB)': 94.61}
100%|██████████| 45/45 [00:41<00:00,  1.07it/s]
***** train metrics *****
epoch                       =        3.0
max_memory_allocated (GB)   =      34.84
memory_allocated (GB)       =        8.6
total_memory_available (GB) =      94.61
train_loss                  =     0.5247
train_runtime               = 0:00:41.84
train_samples               =       3668
train_samples_per_second    =   1663.393
train_steps_per_second      =      6.825

***** eval metrics *****
epoch                       =        3.0
eval_accuracy               =     0.7623
eval_combined_score         =     0.7999
eval_f1                     =     0.8375
eval_loss                   =     0.4668
eval_runtime                = 0:00:02.06
eval_samples                =        408
eval_samples_per_second     =    198.062
eval_steps_per_second       =      3.398
max_memory_allocated (GB)   =      34.84
memory_allocated (GB)       =        8.6
total_memory_available (GB) =      94.61
Training with DeepSpeed
With the DeepSpeed package already installed, run multi-card training with DeepSpeed. Create and point
to a ds_config.json file to set up the parameters of the DeepSpeed run. See the Hugging Face GitHub page
and copy the configuration file example. Once the ds_config.json file is created, copy and paste these instructions into your terminal:
python ../gaudi_spawn.py \
--world_size 8 --use_deepspeed run_glue.py \
--model_name_or_path bert-large-uncased-whole-word-masking \
--gaudi_config_name Habana/bert-large-uncased-whole-word-masking \
--task_name mrpc \
--do_train \
--do_eval \
--per_device_train_batch_size 32 \
--per_device_eval_batch_size 8 \
--learning_rate 3e-5 \
--num_train_epochs 3 \
--max_seq_length 128 \
--output_dir /tmp/mrpc_output_deepspeed/ \
--use_habana \
--use_lazy_mode \
--use_hpu_graphs_for_inference \
--throughput_warmup_steps 3 \
--deepspeed ds_config.json
To learn more about DeepSpeed, refer to the DeepSpeed User Guide for Training. The --output_dir option specifies the directory where the model predictions
and checkpoints will be saved. If the specified output directory already exists, a new directory must be provided. In the example above, the output directory
is redirected to /tmp/mrpc_output_deepspeed/ to avoid conflict with the existing directory /tmp/mrpc_output/ used in the previous sections.
Without this redirection, the example would fail. Alternatively, you can use the --overwrite_output_dir option to overwrite the contents of the existing
output directory.
Inference Example Run
Using inference will run the same evaluation metrics (accuracy, F1 score) as shown above. This will display how well the model has performed:
python run_glue.py --model_name_or_path bert-large-uncased-whole-word-masking \
--gaudi_config_name Habana/bert-large-uncased-whole-word-masking \
--task_name mrpc \
--do_eval \
--max_seq_length 128 \
--output_dir ./output/mrpc/ \
--use_habana \
--use_lazy_mode \
--use_hpu_graphs_for_inference
You have now run training and inference on Gaudi 2 using the Intel Developer Cloud.
Next Steps
For next steps you can refer to the following:
To explore more models from the Model References, start here.
To run more examples using Hugging Face go here.
To migrate other models to Gaudi 2, refer to PyTorch Model Porting.
Setting up a Multi-Server Environment
Follow these steps to manually set up a multi-server environment. This example shows how to set up two Gaudi nodes on the Intel Developer Cloud.
Initial Setup
These generic instructions should be set for any platform:
Make sure CPUs on the node are set to performant mode:
cat /sys/devices/system/cpu/cpu*/cpufreq/scaling_governor
echo performance | sudo tee /sys/devices/system/cpu/cpu*/cpufreq/scaling_governor
cat /sys/devices/system/cpu/cpu*/cpufreq/scaling_governor
Set the Hugepages on all hosts to enable models:
sudo sysctl -w vm.nr_hugepages=150000
cat /proc/meminfo | grep HugePages_Total | awk '{ print $2 }'
Make sure all external ports are set to ON for each host:
/opt/habanalabs/qual/gaudi2/bin/manage_network_ifs.sh  --status
/opt/habanalabs/qual/gaudi2/bin/manage_network_ifs.sh  --up
(Optional) Generate an
/etc/gaudinet.jsonfile for L3 base scaling. This is not required for L2 based scaling. For this two-node example, this file is not needed.
Get the Host IP Address
You will need the IP Addresses of all the nodes in the cluster. From the “My Instances” window, you can see each Host IP address for each node. In the example below, the IP Address is 100.80.239.155. You will need to collect the IP Addresses of all your configured nodes:
Test Using hccl_demo
Running hccl_demo tests basic node to node communications. The first run tests each node individually, and the second uses both nodes together.
Set up the test:
cd /root
git clone https://github.com/HabanaAI/hccl_demo.git
cd hccl_demo/
make clean
Run the first test - a single run using the below command on both nodes individually:
HCCL_COMM_ID=127.0.0.1:5555 python3 run_hccl_demo.py --nranks 8 --node_id 0 --size 256m --test all_reduce --loop 1000 --ranks_per_node 8
Run the second test - run two node hccl_demo. Make sure to replace the
{IP_ADDRESS_NODE0}and{IP_ADDRESS_NODE1}in the commands below with the actual IP addresses of your nodes:python3 run_hccl_demo.py --test all_reduce --loop 1000 --size 32m -mpi --host {IP_ADDRESS_NODE0}:8,{IP_ADDRESS_NODE1}:8 --mca btl_tcp_if_include ens7f1
Test Using DeepSpeed
The next test uses the LLaMA 13B model from Megatron-DeepSpeed GitHub repository.
Prepare a shared directory accessible to all the nodes and clone the Model-References repository to the shared directory from one node:
   cd /shared_dir
   git clone https://github.com/HabanaAI/Megatron-DeepSpeed.git
Set up the environment variables and install necessary modules on all the nodes:
   cd /shared_dir/Megatron-DeepSpeed
   export MEGATRON_DEEPSPEED_ROOT=/path/to/Megatron-DeepSpeed
   export PYTHONPATH=$MEGATRON_DEEPSPEED_ROOT/:$PYTHONPATH
   pip install -r megatron/core/requirements.txt
   pip install git+https://github.com/HabanaAI/[email protected]
   apt update
   apt install pdsh -y
Update the two IP addresses with the ones from your nodes in the
scripts/hostsfile:10.10.100.101 slots=8 10.10.100.102 slots=8
Follow the Dataset Preparation instructions to acquire the full (500GB+) oscar-en dataset. Or, apply the following steps from one node to create a small (0.5GB) and customized RedPajama dataset to check the connectivity between nodes:
mkdir -p /shared_dir/redpajama
cd /shared_dir/redpajama
# download the redpajama dataset list file and merely pick the first jsonl, which is arxiv
wget 'https://data.together.xyz/redpajama-data-1T/v1.0.0/urls.txt'
head -n 1 urls.txt > first_jsonl.txt

while read line; do
  dload_loc=${line#https://data.together.xyz/redpajama-data-1T/v1.0.0/}
  mkdir -p $(dirname $dload_loc)
  wget "$line" -O "$dload_loc"
done < first_jsonl.txt

# download the tokenizer file correspondent to the target model, e.g. LLama13b
wget -O tokenizer.model "https://huggingface.co/huggyllama/llama-13b/resolve/main/tokenizer.model"

# install necessary modules for data preparation
pip install nltk sentencepiece
mkdir -p arxiv_tokenized
python $MEGATRON_DEEPSPEED_ROOT/tools/preprocess_data.py --input arxiv/*.jsonl \
      --output-prefix arxiv_tokenized/meg-gpt2 --tokenizer-model ./tokenizer.model \
      --append-eod --tokenizer-type GPTSentencePieceTokenizer --workers 64
# use the tokenized files from above step to train
Choose the oscar-en dataset or the customized RedPajama to run a multi-server test. For example, run the below command from one of the two nodes:
cd $MEGATRON_DEEPSPEED_ROOT
mkdir -p out_llama
# DATA_DIR_ROOT=/data/pytorch/megatron-gpt/oscar-en
DATA_DIR_ROOT=/shared_dir/redpajama
HL_DATA_FILE_PREFIX=meg-gpt2_text_document HL_RESULTS_DIR=out_llama \
      HL_DATA_DIR_ROOT=${DATA_DIR_ROOT}/arxiv_tokenized HL_HOSTSFILE=scripts/hostsfile \
      HL_TOKENIZER_MODEL=${DATA_DIR_ROOT}/tokenizer.model HL_NUM_NODES=2 HL_PP=2 HL_TP=2 HL_DP=4 scripts/run_llama.sh