Intel Gaudi Secure Firmware Flow
On this Page
Intel Gaudi Secure Firmware Flow
Intel® Gaudi® employs several security mechanisms against remote attacks. It implements a secure FW flow used as a root of trust. The secure FW image is stored in the SPI hash and chain of trust, which U-boot and Linux use to read over PCIe.
Note
For Gaudi 3, enabling the secure FW flow is required only when upgrading SVN. It is not required on a new Gaudi 3 device as it is enabled by default.
For Gaudi 2, the secure FW is enabled by default.
Checking Secure Firmware Status
To check if the secure FW is enabled, run the following command:
sudo hl-fw-loader -f /lib/firmware/habanalabs/gaudi3/gaudi3-security_status.itb
sudo hl-fw-loader -f /lib/firmware/habanalabs/gaudi2/gaudi2-security_status.itb
The output of hl-fw-loader contains the secure FW update status:
Security:       Enabled [Permanent: True]
Keys Present:   Yes
        [0]: Valid
        [1]: Valid
        [2]: Valid
        [3]: Valid
        [4]: Valid
Minimal SVN:    0
Flash W/P:      On
Memory Clean:   No
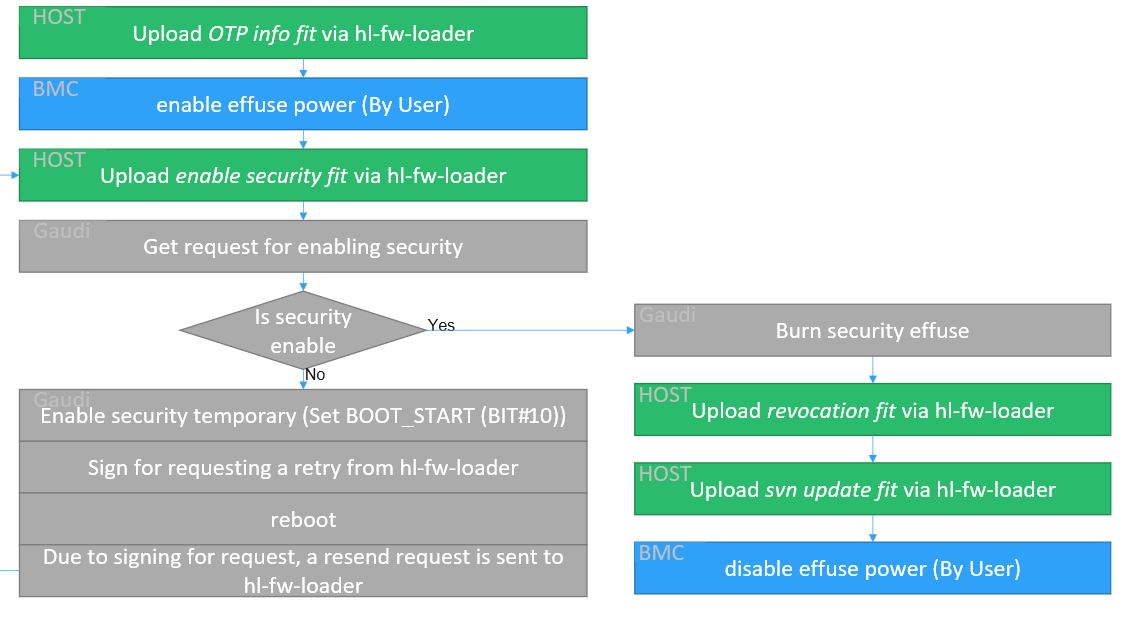
Enabling Secure Firmware Flow
The following steps describe how to enable secure FW flow when upgrading SVN on Gaudi 3.
Note
Make sure to use the latest FW and CPLD versions before performing the procedure. Refer to the Support Matrix for the latest versions. To upgrade the FW, follow the steps in Firmware Upgrade.
Check if security is enabled:
sudo hl-fw-loader -f /lib/firmware/habanalabs/gaudi3/gaudi3-security_status.itb
If the security status is Disabled, proceed to Step 2. The expected output is as follows:
Security:       Disabled [Permanent: True]
Keys Present:   Yes
        [0]: Valid
        [1]: Valid
        [2]: Valid
        [3]: Valid
        [4]: Valid
Minimal SVN:    0
Flash W/P:      On
Memory Clean:   No
Program secureboot_config.itb by sending a request to enable security. During this stage, the device switches to secure FW mode and reboots. After passing the boot sequence successfully in secure FW mode, the eFuse is consequently burnt. After the eFuse is burnt, secure FW mode becomes permanently active:
sudo hl-fw-loader -f gaudi3-secureboot_config.itb
Check if secure FW is enabled:
sudo hl-fw-loader -f /lib/firmware/habanalabs/gaudi3/gaudi3-security_status.itb
The expected output is as follows:
Security:       Enabled [Permanent: True]
Keys Present:   Yes
        [0]: Valid
        [1]: Valid
        [2]: Valid
        [3]: Valid
        [4]: Valid
Minimal SVN:    0
Flash W/P:      On
Memory Clean:   No
Updating SVN
Note
Make sure to use the latest FW and CPLD versions before performing the procedure. Refer to the Support Matrix for the latest versions. To upgrade the FW, follow the steps in Firmware Upgrade.
Once SVN is updated, downgrading to previous FW versions is not possible.
Revoke obsolete security versions. After enabling secure FW mode successfully, obsolete security versions need to be revoked. By using a FIT file for revocation, the device revokes all security versions sequentially until the present one:
sudo hl-fw-loader -f gaudi3-update_svn.itb
Enable eFuse power. eFuse power supply is controlled from the BMC. It is another security measure in which the host cannot program eFuse without having BMC access:
Read the current value of CPLD register 0x6:
sudo i2cget -y -f <i2c_bus> 0x25 0x6
Write 1 to bit 1 of CPLD register 0x6:
sudo i2cset -y -f <i2c_bus> 0x25 0xE <Val | 0x2> # Val is read in step a
Revoke obsolete security versions. After enabling secure FW mode successfully, obsolete security versions need to be revoked. By using a FIT file for revocation, the device revokes all security versions sequentially until the present one:
sudo hl-fw-loader -f gaudi2-update_svn.itb
Disable eFuse power. This is required to prevent accidental burning of eFuse values from host:
Read the current value of CPLD register 0x6:
sudo i2cget -y -f <i2c_bus> 0x25 0x6
Write 0 to bit 1 of CPLD register 0x6:
sudo i2cset -y -f <i2c_bus> 0x25 0xE <Val & ~0x2> # Val is read in step a