IBM Cloud Quick Start Guide
On this Page
IBM Cloud Quick Start Guide
This document provides instructions for setting up the Intel® Gaudi® 3 AI accelerator instance on the IBM Cloud®, installing Intel Gaudi driver and software, and running inference using the Optimum for Intel Gaudi library and the vLLM Inference Server.
Prerequisites
The IBM Cloud account should be set up. Follow the steps in the IBM Cloud documentation.
Create a Gaudi 3 Instance
Follow the below step-by-step instructions to launch a Gaudi 3 instance on the IBM Cloud.
Set up a Virtual Server
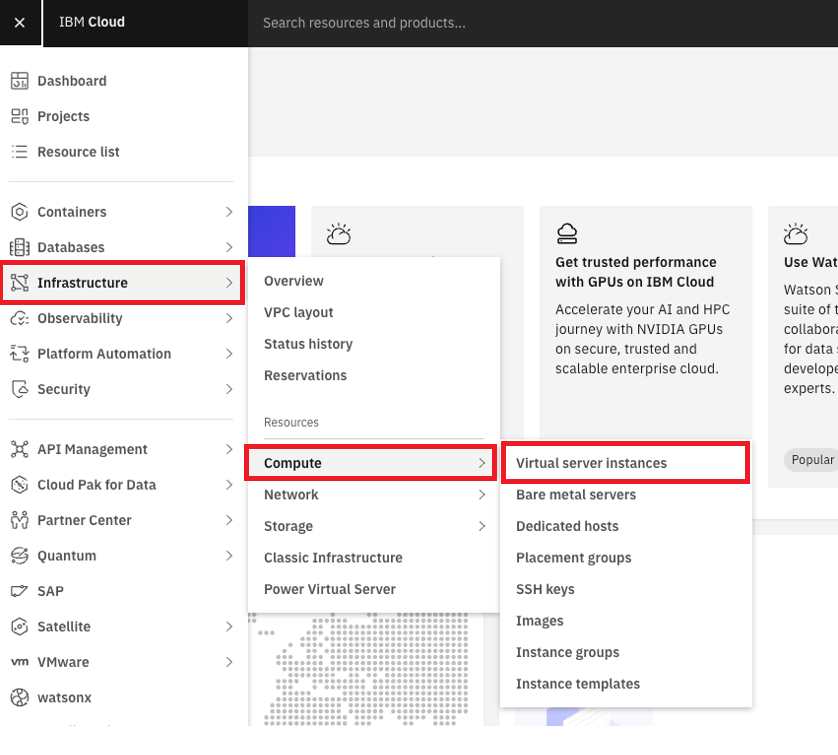
From the IBM Cloud console, go to “Infrastructure > Compute > Virtual server instances”:
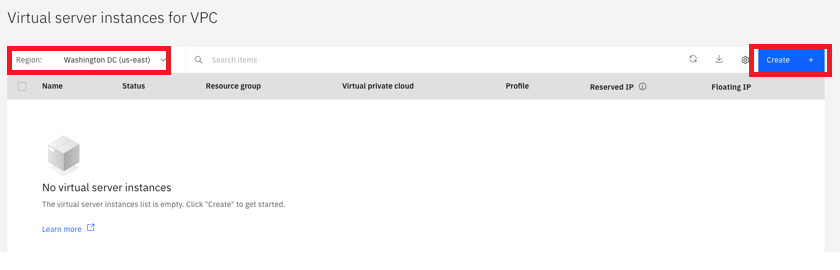
Select the region and click “Create”. For additional information on availability in a region, refer to this page:
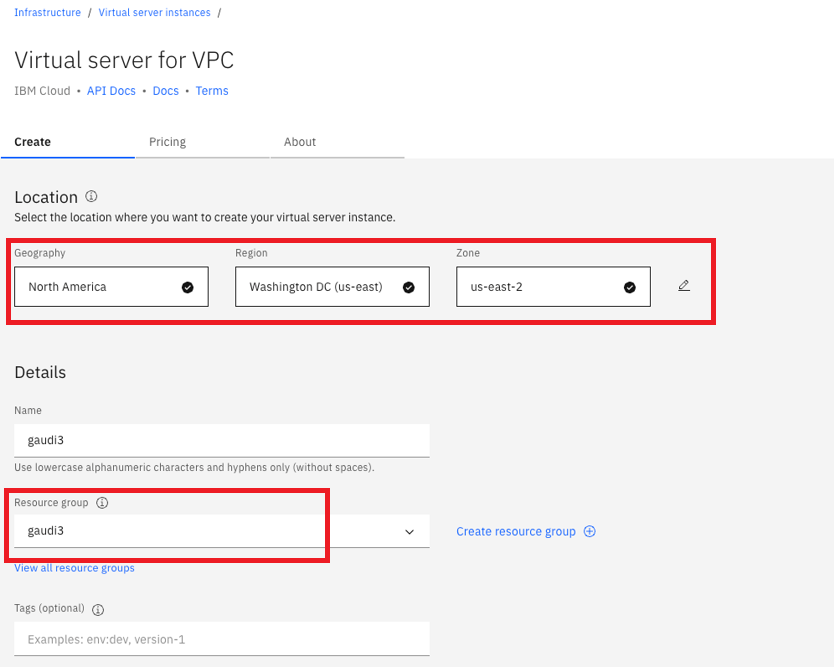
Confirm your geography, Region, and Zone. Name the instance, and select a “gaudi3” resource group:
Navigate down to “Server configuration”, click “Change image” and select your desired image. After your image is selected, click “Change profile”:
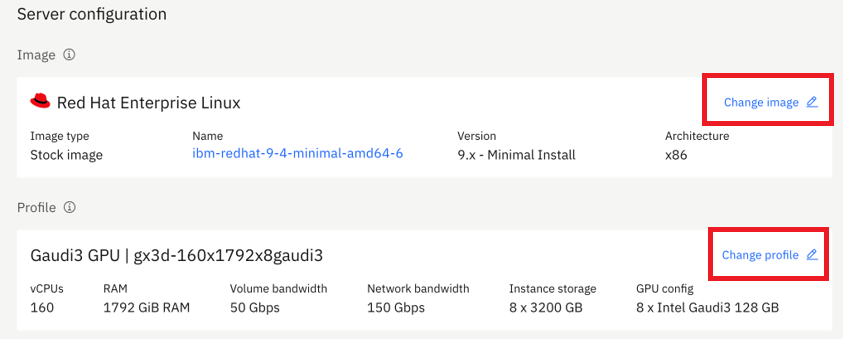
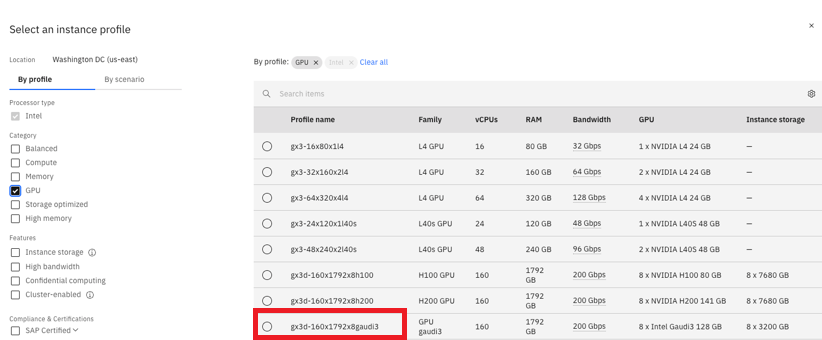
In the left-hand side navigation check the “GPU” box. Select the GPU gx3d-160x1792x8gaudi3 profile from the available GPUs, and click “Save”:
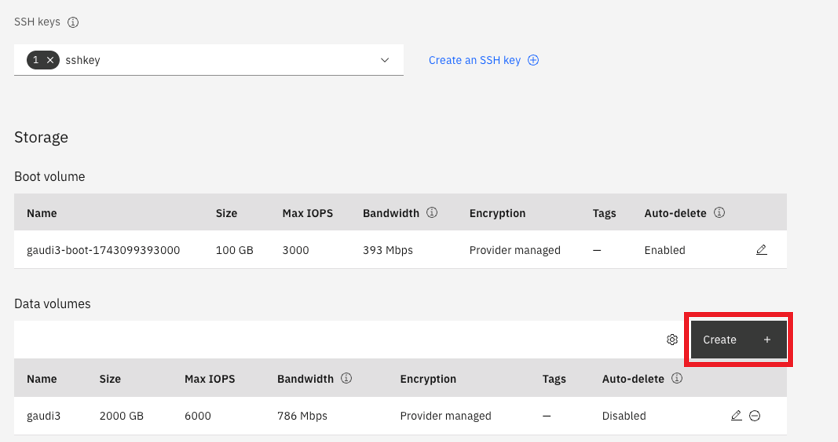
Create or select an SSH key that was previously created. Boot drive is pre-configured, but you can add additional data drives by clicking “Create” and filling out the size of the drive:
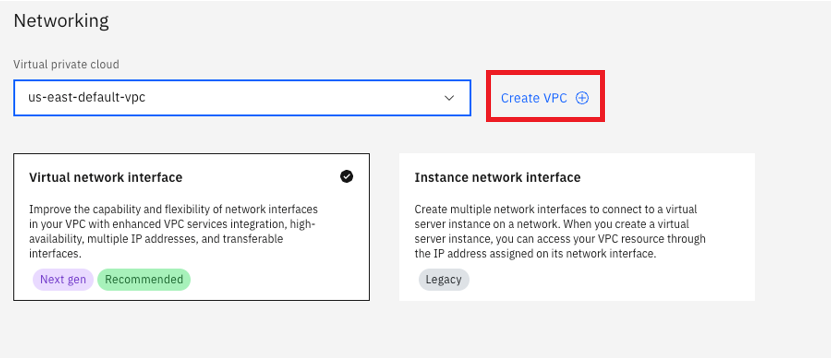
Under “Networking”, you can either use the default generated VPC or create your own by clicking “Create VPC”. The “Virtual network interface” is preselected and is recommended:
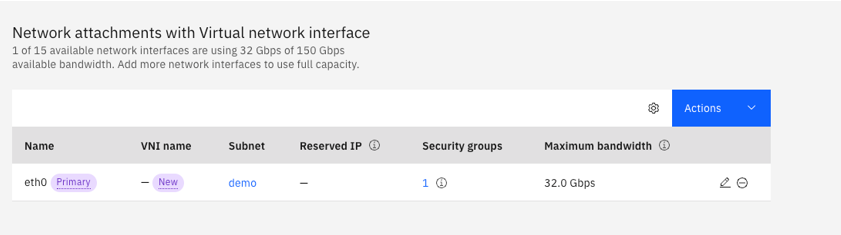
You can add up to 15 interfaces, with a maximum total server bandwidth of 150 Gbps:
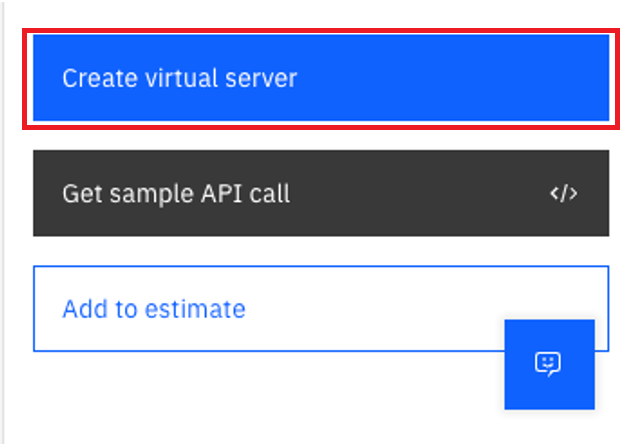
Click “Create virtual server” and begin provisioning. Note that due to the size of the virtual server, it may take up to 20 minutes to complete starting up:
Create Floating IP
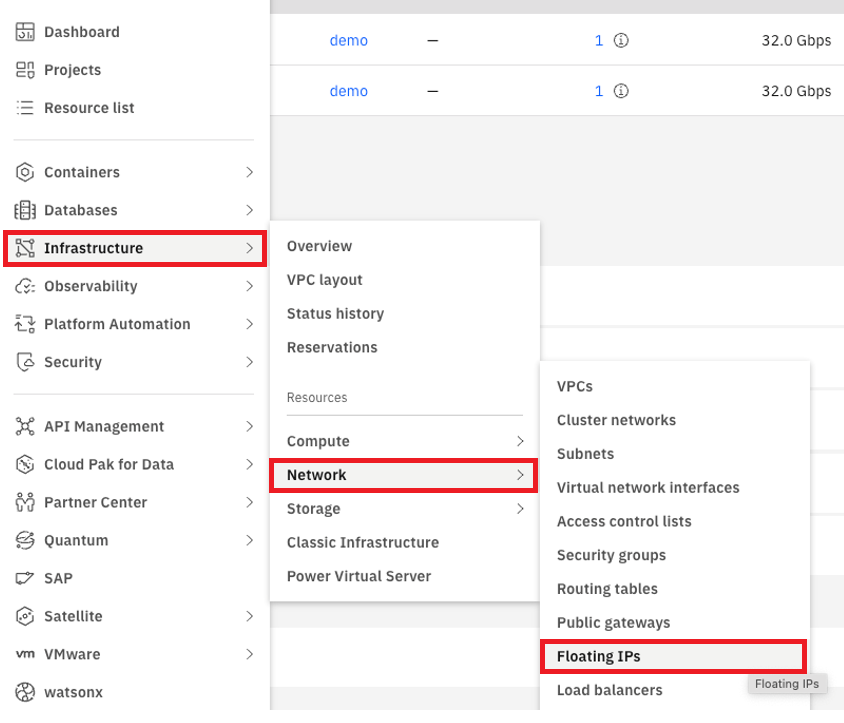
Navigate to “Infrastructure > Network > Floating IPs”:
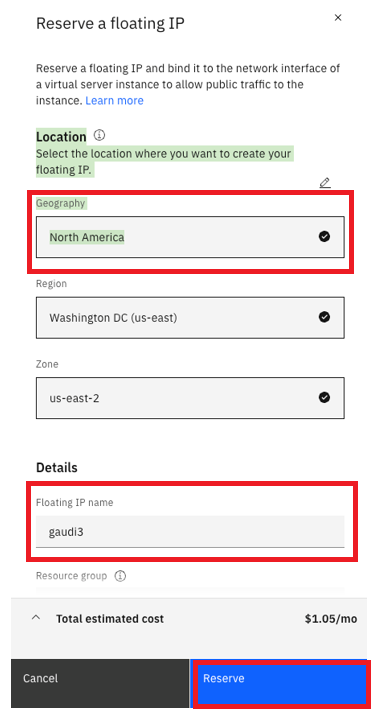
To reserve your Floating IP, select the region that you deployed the “Virtual server instances”, fill in the Floating IP name, and click “Reserve”:
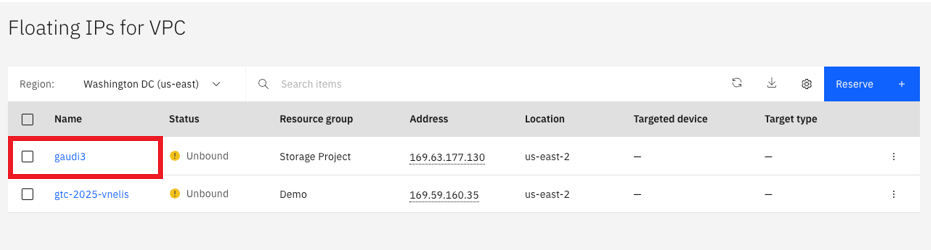
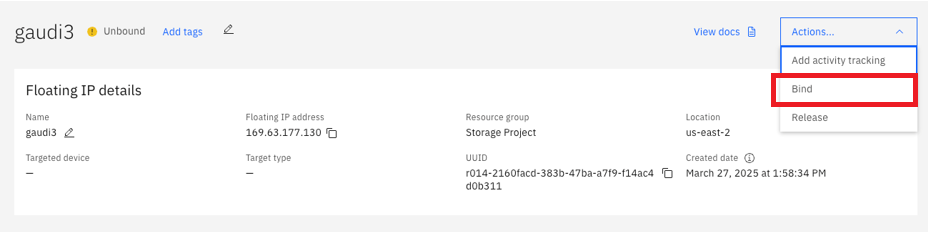
Now that you have a Floating IP, bind it to the “Virtual server instances”. Click on the name of the reserved IP:
From the “Actions” dropdown menu, click “Bind”:
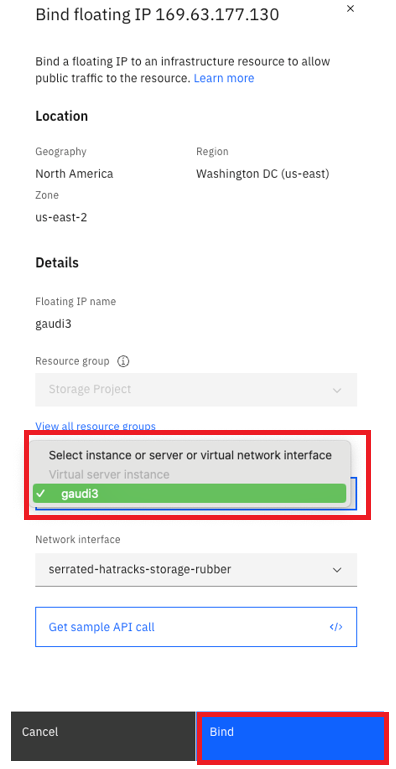
From the dropdown menu, select the Virtual server instance you want to bind the Floating IP to and click “Bind”:
You now have a fully deployed Gaudi 3 instance with a Floating IP attached:

Connect to your Instance
Using the Floating IP address that you created, ping your instance to make sure that it’s up and running:
ping <public-ip-address>
Because you created your instance with a public SSH key, you can now connect to it directly by using your private key:
ssh -i <path-to-private-key-file> root@<public-ip-address>
System Setup - RHEL
Check Installed Devices
From your Gaudi instance, verify that all the Gaudi 3 devices are connected:
lspci -d 1da3: -nn
The output should appear as follows:
a3:00.0  Processing accelerators [1200]:  Habana Labs Ltd.  Device [1da3:1060]  (rev 01)
ad:00.0  Processing accelerators [1200]:  Habana Labs Ltd.  Device [1da3:1060]  (rev 01)
b7:00.0  Processing accelerators [1200]:  Habana Labs Ltd.  Device [1da3:1060]  (rev 01)
c1:00.0  Processing accelerators [1200]:  Habana Labs Ltd.  Device [1da3:1060]  (rev 01)
cb:00.0  Processing accelerators [1200]:  Habana Labs Ltd.  Device [1da3:1060]  (rev 01)
d5:00.0  Processing accelerators [1200]:  Habana Labs Ltd.  Device [1da3:1060]  (rev 01)
df:00.0  Processing accelerators [1200]:  Habana Labs Ltd.  Device [1da3:1060]  (rev 01)
e9:00.0  Processing accelerators [1200]:  Habana Labs Ltd.  Device [1da3:1060]  (rev 01)
Install Intel Gaudi Driver and Software
Note
The system is pre-installed with RHEL 9.6 OS. The following instructions are intended for RHEL 9.4 but also apply to RHEL 9.6 and RHEL 9.8.
This section provides two installation options for the Intel Gaudi driver and software. Follow the appropriate installation steps based on your system requirements.
Verify the installed kernel version:
sudo dnf list installed | grep kernelThe output should appear as follows:
kernel-core.x86_64            5.14.0-427.50.1.el9_4    @rhel-9-for-x86_64-baseos-eus-rpms
kernel-modules.x86_64         5.14.0-427.50.1.el9_4    @rhel-9-for-x86_64-baseos-eus-rpms
kernel-modules-core.x86_64    5.14.0-427.50.1.el9_4    @rhel-9-for-x86_64-baseos-eus-rpms
kernel-tools.x86_64           5.14.0-427.50.1.el9_4    @rhel-9-for-x86_64-baseos-eus-rpms
kernel-tools-libs.x86_64      5.14.0-427.50.1.el9_4    @rhel-9-for-x86_64-baseos-eus-rpms
Note
The output example displays the kernel version installed on RHEL 9.4. The output may vary depending on the RHEL version in use.
Verify the available kernel packages that match the kernel version retrieved in Step 1.
sudo dnf list --showduplicates | grep 5.14.0-427.50.1.el9_4Install the kernel development and header packages. Ensure they match the currently installed kernel version:
sudo dnf install kernel-devel-5.14.0-427.50.1.el9_4.x86_64 kernel-devel-matched-5.14.0-427.50.1.el9_4.x86_64 kernel-headers-5.14.0-427.50.1.el9_4.x86_64Install the
wgetutility:sudo dnf install -y wgetDownload the
habanalabs-installer.shscript:sudo wget -nv https://vault.habana.ai/artifactory/gaudi-installer/1.24.1/habanalabs-installer.sh sudo chmod +x habanalabs-installer.shInstall the EPEL repository:
sudo dnf install -y https://dl.fedoraproject.org/pub/epel/epel-release-latest-9.noarch.rpm --nogpgcheckThe EPEL repository provides access to extra packages that are not included in the default RHEL repositories.
Install Intel Gaudi driver and software:
sudo ./habanalabs-installer.sh install --type baseClick “Y” when you see
Prepare installationto finish the installation - it will not complete until you confirm.
To verify that the installation is successful, follow the steps outlined in the System Verifications and Final Tests section.
Install the EPEL repository:
sudo dnf install -y https://dl.fedoraproject.org/pub/epel/epel-release-latest-9.noarch.rpm --nogpgcheckThe EPEL repository provides access to extra packages that are not included in the default RHEL repositories.
Verify the installed kernel version:
sudo dnf list installed | grep kernelThe output should appear as follows:
kernel-core.x86_64            5.14.0-427.50.1.el9_4    @rhel-9-for-x86_64-baseos-eus-rpms
kernel-modules.x86_64         5.14.0-427.50.1.el9_4    @rhel-9-for-x86_64-baseos-eus-rpms
kernel-modules-core.x86_64    5.14.0-427.50.1.el9_4    @rhel-9-for-x86_64-baseos-eus-rpms
kernel-tools.x86_64           5.14.0-427.50.1.el9_4    @rhel-9-for-x86_64-baseos-eus-rpms
kernel-tools-libs.x86_64      5.14.0-427.50.1.el9_4    @rhel-9-for-x86_64-baseos-eus-rpms
Note
The output example displays the kernel version installed on RHEL 9.4. The output may vary depending on the RHEL version in use.
Verify the available kernel packages that match the kernel version retrieved in Step 2.
sudo dnf list --showduplicates | grep 5.14.0-427.50.1.el9_4Install the kernel development and header packages. Ensure they match the currently installed kernel version:
sudo dnf install kernel-devel-5.14.0-427.50.1.el9_4.x86_64 kernel-devel-matched-5.14.0-427.50.1.el9_4.x86_64 kernel-headers-5.14.0-427.50.1.el9_4.x86_64Reboot the system:
sudo rebootAfter 10 minutes, log in to your machine and update the software package manager (dnf) and kernels:
sudo dnf update –yInstall the
wgetutility:sudo dnf install -y wgetDownload the
habanalabs-installer.shscript:sudo wget -nv https://vault.habana.ai/artifactory/gaudi-installer/1.24.1/habanalabs-installer.sh sudo chmod +x habanalabs-installer.shInstall Intel Gaudi driver and software:
sudo ./habanalabs-installer.sh install --type baseClick “Y” when you see
Prepare installationto finish the installation - it will not complete until you confirm.
To verify that the installation is successful, follow the steps outlined in the System Verifications and Final Tests section.
Run Gaudi Docker Container
For RHEL, use Docker images built from the Dockerfiles available in the `Setup_and_Install https://github.com/HabanaAI/Setup_and_Install/tree/main/dockerfiles>`_ repository. Alternatively, contact the support team for the required RHEL-based Docker image. The method used to obtain the RHEL-based Docker image does not affect the remaining setup flow.
After the appropriate Docker image is available, start the container using the standard Intel Gaudi Docker runtime configuration:
sudo docker run -it \
   --runtime=habana \
   -e HABANA_VISIBLE_DEVICES=all \
   -e OMPI_MCA_btl_vader_single_copy_mechanism=none \
   -v /opt/datasets:/datasets \
   --cap-add=sys_nice \
   --net=host \
   --ipc=host \
   <rhel-gaudi-docker-image>
Make sure to replace <rhel-gaudi-docker-image> with the RHEL-based Docker image that you built
or obtained from the support team.
Note
This setup is required only once to configure the Gaudi container runtime and obtain the Gaudi container.
System Setup - Ubuntu
Check Installed Devices
From your Gaudi instance, verify that all the Gaudi 3 devices are connected:
lspci -d 1da3: -nn
The output should appear as follows:
a3:00.0  Processing accelerators [1200]:  Habana Labs Ltd.  Device [1da3:1060]  (rev 01)
ad:00.0  Processing accelerators [1200]:  Habana Labs Ltd.  Device [1da3:1060]  (rev 01)
b7:00.0  Processing accelerators [1200]:  Habana Labs Ltd.  Device [1da3:1060]  (rev 01)
c1:00.0  Processing accelerators [1200]:  Habana Labs Ltd.  Device [1da3:1060]  (rev 01)
cb:00.0  Processing accelerators [1200]:  Habana Labs Ltd.  Device [1da3:1060]  (rev 01)
d5:00.0  Processing accelerators [1200]:  Habana Labs Ltd.  Device [1da3:1060]  (rev 01)
df:00.0  Processing accelerators [1200]:  Habana Labs Ltd.  Device [1da3:1060]  (rev 01)
e9:00.0  Processing accelerators [1200]:  Habana Labs Ltd.  Device [1da3:1060]  (rev 01)
Install Intel Gaudi Driver and Software
Note
The system is pre-installed with Ununtu 24.04.2 OS. The following instructions are intended for Ubuntu 24.04.2 but also apply to Ubuntu 22.04.5.
Update apt and upgrade the packages. If a menu appears, select OK and continue:
sudo apt update && sudo apt -y upgrade
Reboot the system:
sudo reboot
After 10 minutes, reconnect to the system and download the
habanalabs-installer.shscript:wget -nv https://vault.habana.ai/artifactory/gaudi-installer/1.24.1/habanalabs-installer.sh chmod +x habanalabs-installer.sh
Install Intel Gaudi driver and software:
./habanalabs-installer.sh install --type base
Click “Y” when asked if you wish to install.
Reboot the system:
sudo reboot
Note
The installation process takes approximately 7 minutes to complete.
You may see this error message after the installation:
W: GPG error: https://vault.habana.ai/artifactory/debian noble InRelease: The following signatures couldn't be verified because the public key is not available: NO_PUBKEY 16DF67E63BA2D625
E: The repository 'https://vault.habana.ai/artifactory/debian noble InRelease' is not signed.
Ignore it and move to the next Step.
To verify that the installation is successful, follow the steps outlined in the System Verifications and Final Tests section.
Install Docker Engine and Gaudi Docker Container
The following steps are required only once to set up the Docker engine, Gaudi container runtime, and the Gaudi container itself.
Note
The steps below are based on the recommended method from the official Docker website.
Update the
aptrepository:Add Docker’s official GPG key:
sudo apt-get update
sudo apt-get install ca-certificates curl
sudo install -m 0755 -d /etc/apt/keyrings
sudo curl -fsSL https://download.docker.com/linux/ubuntu/gpg -o /etc/apt/keyrings/docker.asc
sudo chmod a+r /etc/apt/keyrings/docker.asc
Add the repository to
aptsources:echo \ “deb [arch=$(dpkg --print-architecture) signed-by=/etc/apt/keyrings/docker.asc] https://download.docker.com/linux/ubuntu \ (. /etc/os-release && echo “${UBUNTU_CODENAME:- $VERSION_CODENAME}”) stable” | \ sudo tee /etc/apt/sources.list.d/docker.list> /dev/null sudo apt-get update
Install the Docker packages:
sudo apt-get install docker-ce docker-ce-cli containerd.io docker-buildx-plugin docker-compose-plugin
Click “Y” when asked if you wish to install.
Install
habanalabs-container-runtimepackage. This package is required for running workloads in containers. Both Docker and Kubernetes are supported:sudo apt install -y habanalabs-container-runtime
Register
habana-container-runtimeby adding the following toetc/docker/daemon.jsonas mentioned in the Docker Installation section:sudo tee /etc/docker/daemon.json <<EOF { "runtimes": { "habana": { "path": "/usr/bin/habana-container-runtime", "runtimeArgs": [] } } } EOF
Verify that the contents of the file match the above output:
sudo cat /etc/docker/daemon.json
Add your user to the Docker group:
sudo usermod -aG docker $USER
Reload daemon:
sudo systemctl daemon-reload
Restart the Docker service:
sudo systemctl restart docker
Install the latest Gaudi Docker container:
sudo docker run -it --runtime=habana -e HABANA_VISIBLE_DEVICES=all -e
OMPI_MCA_btl_vader_single_copy_mechanism=none -v /opt/datasets:/datasets
--cap-add=sys_nice --net=host --ipc=host
vault.habana.ai/gaudi-docker/1.24.1/ubuntu24.04/habanalabs/pytorch-installer-2.11.0:latest
The no hostkeys available message can be safely ignored. You should now be inside the container.
Run Inference
After setting up the Docker container in the previous section, follow the instructions below to run inference workloads inside the Docker container terminal. The examples below demonstrate how to run inference on a single card using the Optimum for Intel Gaudi library, and on multiple cards using the vLLM Inference Server with the Llama 3.2-1B and Granite 34B-code-instruct-8K models, respectively. For additional models tested on IBM with Gaudi 3, refer to the IBM FM Benchmarking Framework GitHub repository.
Inference on a Single Gaudi Card Using Optimum for Intel Gaudi with Llama 3.2-1B
Install the Optimum for Intel Gaudi library:
pip install --upgrade-strategy eager optimum[habana]
Clone the
optimum-habanarepository for running the example code:cd root && git clone https://github.com/huggingface/optimum-habana
Check the latest branch of
optimum-habana. Note that the branch version number is different from Gaudi software version number:cd optimum-habana && git checkout v1.20.0
Install the requirements for running text generation task:
cd examples/text-generation &&
pip install -r requirements.txt &&
pip install -r requirements_lm_eval.txt
Create your own user account and obtain an HF_TOKEN from the Hugging Face website. Then, export the HF_TOKEN environment variable and insert your token as shown below:
export HF_TOKEN=<INSERT YOUR OWN HF_TOKEN HERE>
Set up the
HF_HOMEenvironment variable to point to/dev/shmwhere the model checkpoints are downloaded:export HF_HOME=/dev/shm
Run inference:
ENABLE_LB_BUNDLE_ALL_COMPUTE_MME=0 ENABLE_EXPERIMENTAL_FLAGS=1 python ../gaudi_spawn.py \
--world_size 1 run_generation.py \
--model_name_or_path NousResearch/Llama-3.2-1B \
--max_new_tokens 2048 \
--bf16 \
--use_hpu_graphs \
--use_kv_cache \
--batch_size 1 \
--do_sample \
--use_flash_attention \
--flash_attention_causal_mask
The final output should appear as follows:
Stats:
----------------------------------------------------------------------------------
Input tokens
Throughput (including tokenization) = 192.1497924325992 tokens/second
Memory allocated                    = 9.88 GB
Max memory allocated                = 9.9 GB
Total memory available              = 126.06 GB
Graph compilation duration          = 32.885373371012975 seconds
----------------------------------------------------------------------------------
Inference on Multiple Gaudi Cards Using vllm-fork with Granite 34B-code-instruct-8K
Install vllm-fork:
cd /root
git clone https://github.com/HabanaAI/vllm-fork.git
cd vllm-fork
git checkout v0.9.0.1+Gaudi-1.22.0
pip install -r requirements-hpu.txt
python3 setup.py develop
pip install datasets
Note
You may see this error message after running
pip install -r requirements-hpu.txt:### Received error: ERROR: pip's dependency resolver does not currently take into account all the packages that are installed. This behaviour is the source of the following dependency conflicts. neural-compressor-pt 3.3 requires numpy==1.23.5; python_version < "3.12", but you have numpy 1.26.4 which is incompatible.
Ignore it and move to the next Step.
Create your own user account and obtain an HF_TOKEN from the Hugging Face website. Then, export the HF_TOKEN environment variable and insert your token as shown below:
export HF_TOKEN=<INSERT YOUR OWN HF_TOKEN HERE>
Set up environment variables:
export ENABLE_EXPERIMENTAL_FLAGS=1
export HCL_SCALEUP_SIMB_COUNT=13
export HF_HOME=/dev/shm
Launch the vLLM Server using the IBM Granite 34B-code-instruct-8K model and allow 20 minutes for it to initialize and warm up:
vllm serve ibm-granite/granite-34b-code-instruct-8k \
   --port 8080 \
   --swap-space 16 \
   --disable-log-requests \
   --block-size 128 \
   --tensor-parallel-size 8 2>&1 | tee server_granite34b_vllm.log
After around 20 minutes, the following output should appear when your server is ready:
INFO 02-27 22:13:00 launcher.py:27] Route: /invocations, Methods: POST
INFO:     Started server process [18027]
INFO:     Waiting for application startup.
INFO:     Application startup complete.
INFO:     Uvicorn running on http://0.0.0.0:8080 (Press CTRL+C to quit)
Wait for the server to get fully ready as shown in the above screenshot. Then, in a separate terminal, SSH into the instance and connect to the Docker:
sudo docker ps
sudo docker exec -it <gaudi container id> bash
In the Docker container, switch to the benchmarks subdirectory:
cd /root/vllm-fork/benchmarks
Run inference:
ENABLE_EXPERIMENTAL_FLAGS=1 \
HCL_SCALEUP_SIMB_COUNT=13 \
python3 benchmark_serving.py \
   --backend vllm \
   --port 8080 \
   --model ibm-granite/granite-34b-code-instruct-8k \
   --dataset-name sonnet \
   --dataset-path sonnet.txt \
   --sonnet-input-len 1024 \
   --sonnet-output-len 1024 \
   --trust-remote-code 2>&1 | tee client_benchmark_granite34b_vllm.log
The final output should appear as follows:
============ Serving Benchmark Result ============
Successful requests:                     1000
Benchmark duration (s):                  180.71
Total input tokens:                      1028593
Total generated tokens:                  762666
Request throughput (req/s):              5.53
Output token throughput (tok/s):         4220.35
Total Token throughput (tok/s):          9912.26
---------------Time to First Token----------------
Mean TTFT (ms):                          64007.19
Median TTFT (ms):                        64302.62
P99 TTFT (ms):                           143460.93
-----Time per Output Token (excl. 1st token)------
Mean TPOT (ms):                          57.47
Median TPOT (ms):                        56.23
P99 TPOT (ms):                           116.77
---------------Inter-token Latency----------------
Mean ITL (ms):                           54.17
Median ITL (ms):                         39.87
P99 ITL (ms):                            228.03
==================================================